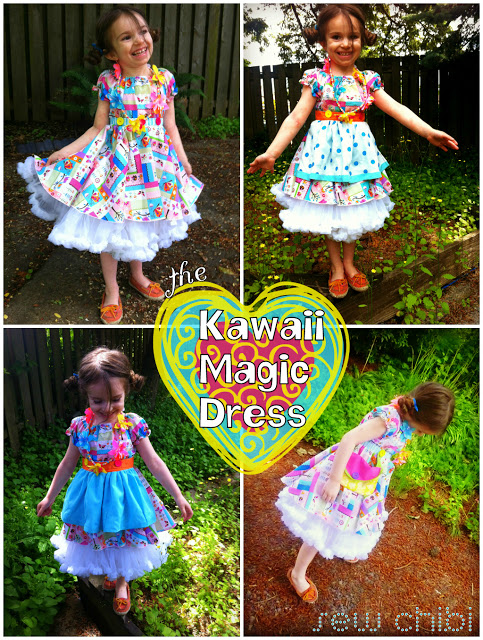
Kawaii Magic dress & purse tutorial
I wanted to share this tutorial that I tried to share at Project Run & Play recently. I ended up sharing it here on my blog instead because Mozilla & Blogger & and the Universe were against me.
We surrender.
Mozilla, Blogger, and all Interwebs:
You win.
Apparently I didn't have a chance against you!
I had this allll organized into two sweet posts but despite our best (and I mean BEST), LiZ and I wave the white flag.
I am a million shades of pink from embarrassment, 10 shades of
blue from sadness that this Bermuda Triangle thing happen to me, and one lonely shade of white from pretty much a completely sleepless night. Worse night I've had in I can't remember how long. And I just feel so bad because LiZ tried so incredibly hard as well.
Greetings PR&P readers! I’m Kat, a mom to two adorable little girls and, fledgling blogger over at sew chibi! You might remember me from my purple bias strip dress from the sew along for PR&P 4 color challenge. I am super excited to be here today for my first guest post!! I hope you all like my presentation and can find my tutorials useful!
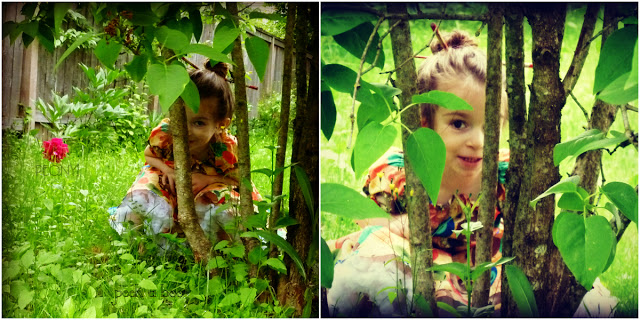
I always like to make Azriella’s spring and summer wardrobe year to year. There’s just something about seeing you little ones prance around every day in something that you made! It really warms my heart! The thing about dresses for little ones is that they aren’t always handled with care… I know in my case, when my little girl dresses herself or my husband dresses her, there is nothing graceful about it! So I try to make an effort to make things that can be easily slipped on and off for that sake. But lately, I really like a fitted look on my chibi. That usually means there are zippers or buttons involved, which usually means at least one sigh, grumble or missed button from either Dad or Azy. I also have a philosophy to make clothes fun by adding surprising details.
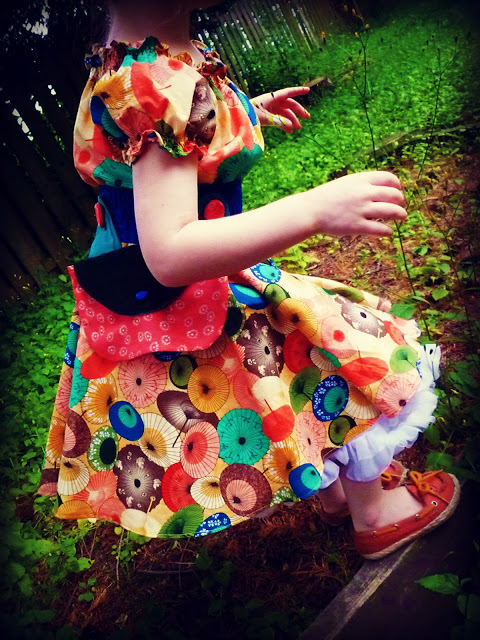
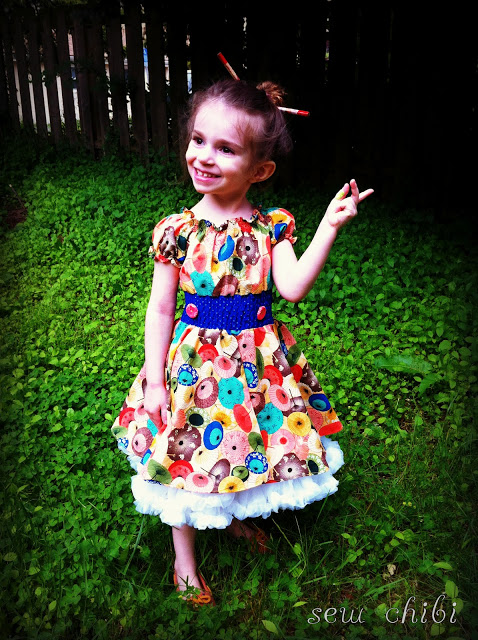
SO! In an effort to make a fitted, easy to wear dress, that is still super fun and girly, I present to you my “Kawaii Magic Dress.”
…
Magic?
…
why magic?
Well, because, this dress has a few tricks up its sleeve (Ha! A little sewing humor there ;-)
You want the real tricks or the behind the scene tricks first?
…
Behind the scenes it is! So! There’s isn’t one elastic casing! You could certainly do them if you prefer but I was pleased not to do them! I recently figured out where I was going wrong in the whole shirring show:
I needed to use lighter weight fabric!
Thanks Anne! If that doesn’t help you, this should do the trick. So you see, you have options!
Secret number two? Well, I’m not so sure it’s much of a secret, more of an added perk, but the dress itself took only a couple of hours to make. Really.
Now the real magic: Surprise!
It’s the dress of a thousand faces! A dress with interchangeable options!!!
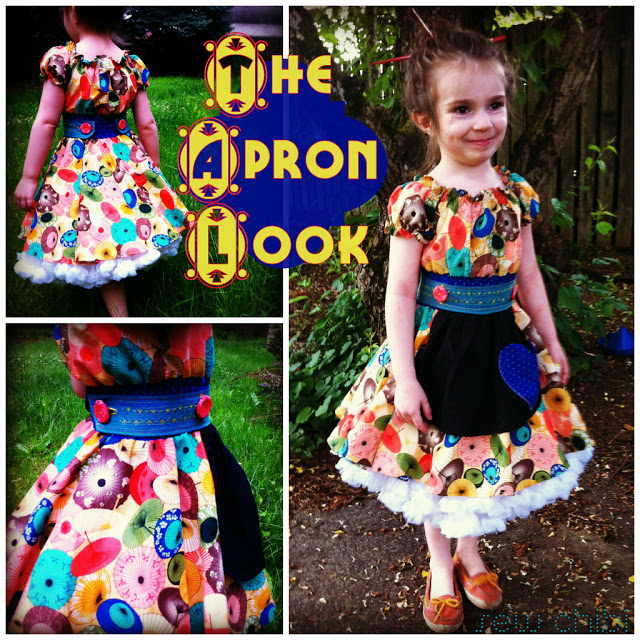
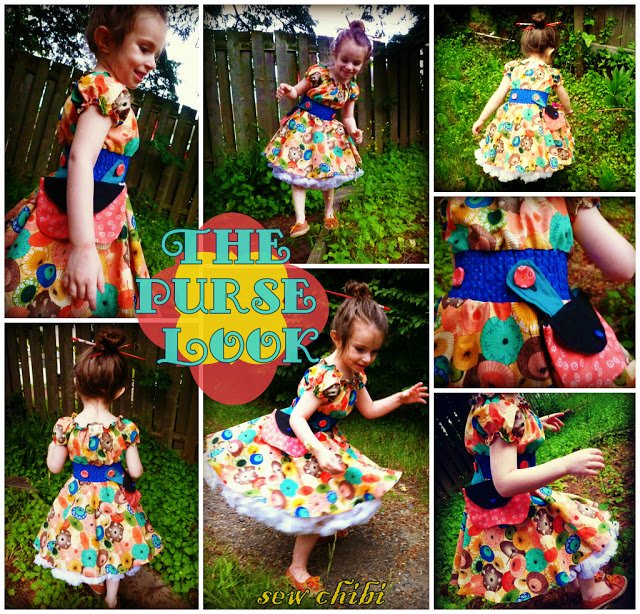
Well what do you think? Those big decorative buttons are sweet all on their own, but imagine the possibilities! You could do a removable bustle, a ruffled back panel, a craft pouch, a full apron, a kangaroo pocket, a plain ol’ awesome belt!... I could keep going if you like. So you see, it is sort of magic!
Hmmm… what should we make? How about the dress and the purse, sound good? Great! Let’s start with the dress!
HERE’S WHAT YOU WILL NEED:
•One yard of fabric for the skirt (stick to lightweight fabrics)
•Half a yard of fabric for the bodice
•A quarter yard (or sufficient scrap) of fabric for the waist
•Complimenting scraps for your purse
•Elastic thread (or ¼” if you want to do casings, or ⅛” elastic if you are faux shirring)
•Sewing stuff (matching thread and whatnot)
•Four 1” buttons (even smaller scraps if you are going to cover them. I like to use as much of my scraps as possible)
•Small bit of interfacing (don’t worry, you don’t HAVE to use it but it would help the longevity of your buttonholes.
•Sew on Velcro (just the tiniest bit for the purse closure)
•Circle skirt pattern (we’ll be modifying it below, and if you have a girl with a 19” waist that’s about 35 or so inches tall, just follow mine!)
•Peasant Bodice & Sleeve Pattern
(please don’t laugh too much. It’s my first PDF pattern. You can lengthen it if you desire a longer bodice, or shorten it for an empire look. The dress in the pics is the size 4 with no alterations.)
*all seam allowances are ½” unless otherwise noted*
The dress.
Ever since I made my first circle skirt for the PR&P sew along, I’ve been hooked! Super easy and super twirly, I mean, does it get any better than that?! But I missed the look of a gathered waistline, so I decided to combine the two. I tried this out originally with just some ¼” elastic for this vintage peasant dress I had made, and I felt like I reinvented the wheel- seriously, I ran around ranting about my new “revolutionary” technique. Now I’m not sure if it would pass muster with some seamstresses but it passed my test: easy (to do and to put on), comfy, and fitted. This look is seriously changing my life with how fast and beautiful you can pump out some dresses!
Okay! So let’s get started!
• First you need to draft your circle skirt! Let me first say
if you have a little girl whose measurements are roughly 18-20” waist and is about 35” tall or so, just go ahead and use my measurements!
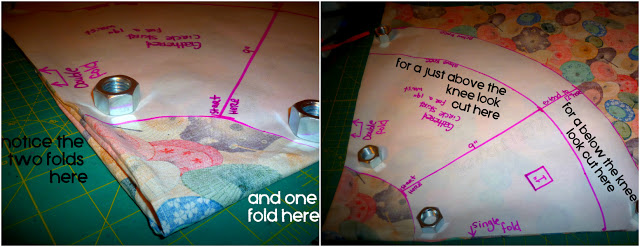
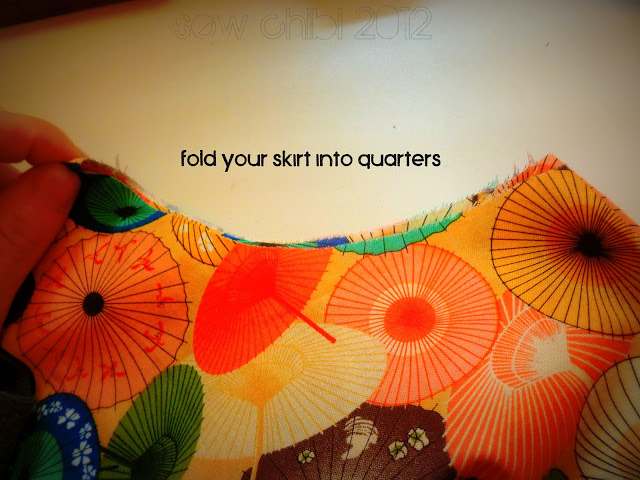
So fold your fabric into quarters. Make sure one side has a single fold and one side has a double fold (with no raw edges) Then, follow this to find your quarter circle measurement: waist plus two inches for ease, then divide it by 6.28 (that magic number is 2 x pi) Now you’ve got your number (mine was 3.26), just round up about ¾ of an inch (in my case, I rounded to 4” for a nice gather).
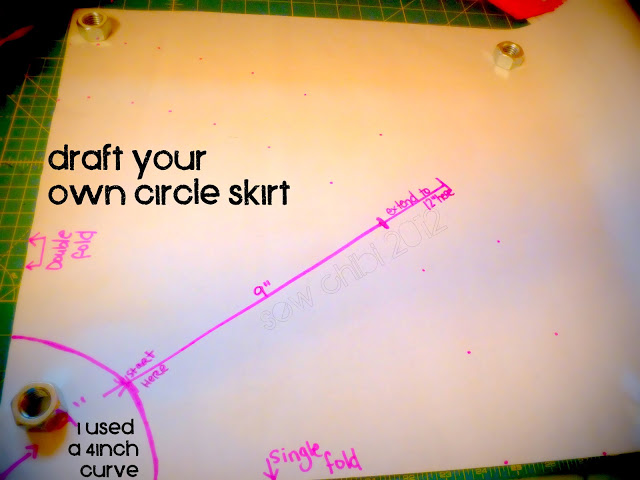
• Next you’ll want to decide how long to make your skirt. I usually like either just above the knee or just below, so I drafted a pattern that shows both lengths. My method for measuring is to just take a clear ruler and, starting from your small curve edge, measure to your desired length and mark on either side and move the ruler and do that again all the way from the double fold to the single fold.
• Finish the hem of the skirt now if you want, by either by clipping around the curve and then ironing it under ¼” twice then stitching it in place, or you could use your serger. A narrow rolled hem looks nice, (just remove the stitch finger and left needle and lower your upper looper thread to about a 3 and crank your lower looper to about a 6 or more if you can), or you could just do a regular serged hem then press it under once and stitch (thank you
for the tip!)
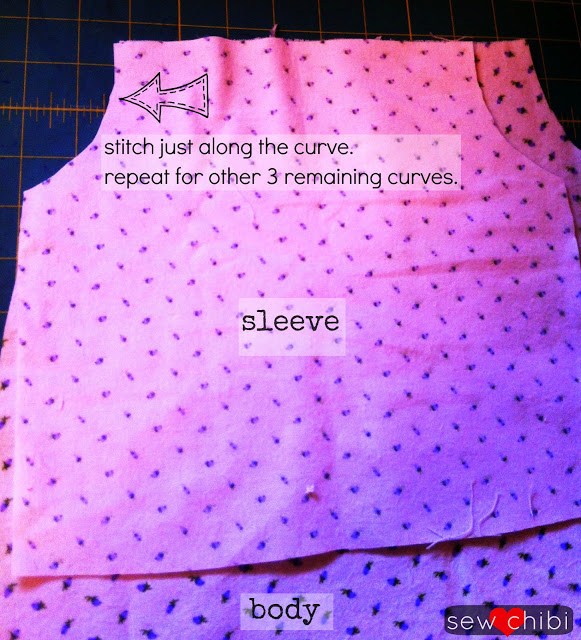
• Now let’s do the bodice. Start by finding your size on the pattern and cutting out two bodice pieces and two sleeve pieces (don’t worry if the size seems a little roomy, it will be gathered in the end.) If you have a go to peasant bodice pattern already you should be fine to use that, just scale my pattern to 100% and hold yours up to the computer and see if it’s comparable. Also you will want to cut a complementing strip of fabric for your waist band. I use a piece of fabric that was the same width as my bodice (about 23”for my dress) and about 4 inches long (extend or shorten as you desire).
• Start by joining the sleeve pieces to the sides of the bodice and then attach the remaining bodice piece. If this is confusing check out this pic from an earlier post:
• Next, you are going to turn under the hems of the sleeves and neckline a ¼” twice (aka a narrow hem,) and stitch in place.
Now we’re going to shirr. Make sure you’re using lightweight material and I recommend always testing your shirring out on a scrap first. If your material is medium weight or more, do the faux shirring technique (if you are worried about the look, you could dye it to match the fabric).
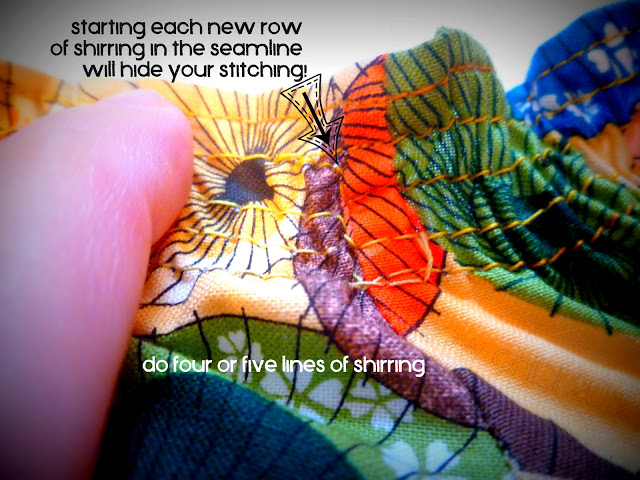
• Just hand wind your elastic thread with just a little tension around your bobbin (I think one bobbin should suffice, but if it makes you feel better, do two bobbins) and use thread that matches your fabric for your needle thread. Now set your stitch length for the longest stitch length. Some people mark the placement of the stitch lines on the top of the fabric, but I just use the side of my presser foot and I stitch with a ½” stitch distance. Backstitch a couple of times, then off you go! (If the elastic stitches underneath are anything but straight, stop. Try to rip the needle thread out and conserve your elastic and do a fabric test again or start over) When it comes time to do a new line of stitching, just leave the needle in the fabric and do a lengthwise stitch about three times and then turn your fabric again back to a widthwise stitch. Repeat for about 4 or 5 rows.
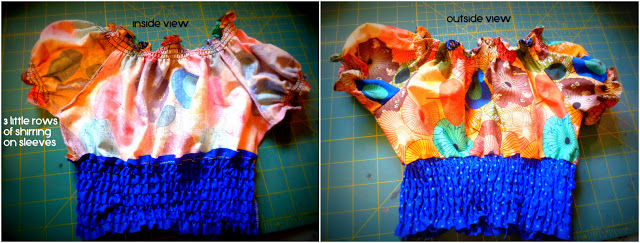
• Repeat for the sleeves only, this time do a ¼” stitch distance, two lengthwise stitches (instead of three), and only do 2 or 3 lines of stitching.
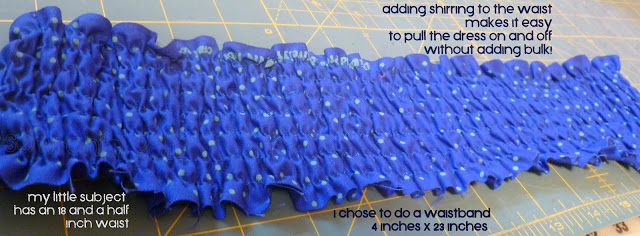
• Now for the waistband, it actually looks better if you sew the short ends together now to form a tube. (Please excuse the picture below that, ahem, did not do that). Sew with the ½” stitch distance and start a ½” down from the top. I did about 7 rows of shirring, stopping when I had a ½” left on the bottom.
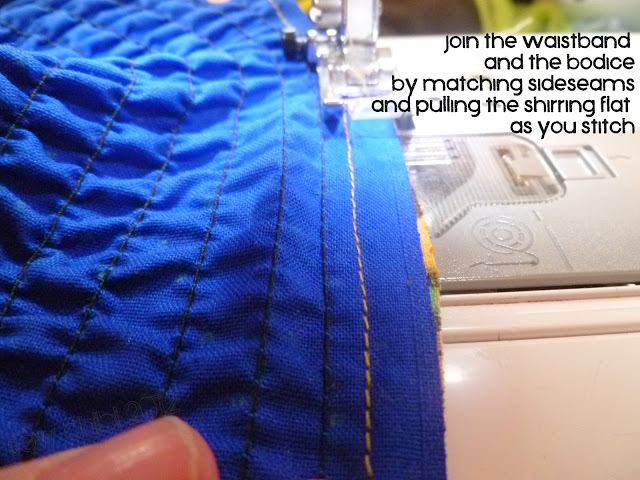
• It’s time to join the waistband to the bodice! Find your waistband side seam. Pull the fabric to its original length (as best you can) and mark that spot. Then match up both your bodice side seams and your waistband side seams and pin them together, making sure to stretch the shirring as you stitch the bodice (this is what will create the bodice gathered look). Stitch with a regular stitch length just under your shirring seam, pulling the waistband to match the bodice as you sew.
• Next, set your iron to a steam setting, spritz your shirring with water, and then hover it over the fabric. Ahhh, so satisfying to watch it all shrink up, isn’t it!?!
Hurray your bodice is done! Go ahead and try it on your little girl or dressform to check the fit is proper. And actually if you wanted to make this a top, you could just modify this by hemming the bottom before you shirr! What a cute top, right?! I loved it so much I contemplated making it two pieces!
• Put the bodice to the side and let’s start on the skirt.
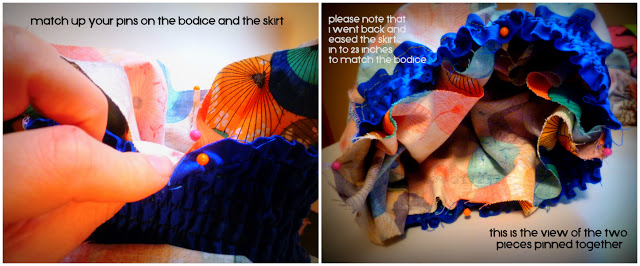
• So first we have to ease in the skirt to 23” or whatever your original width of your bodice was by doing a gathering stitch. Next…
and then…
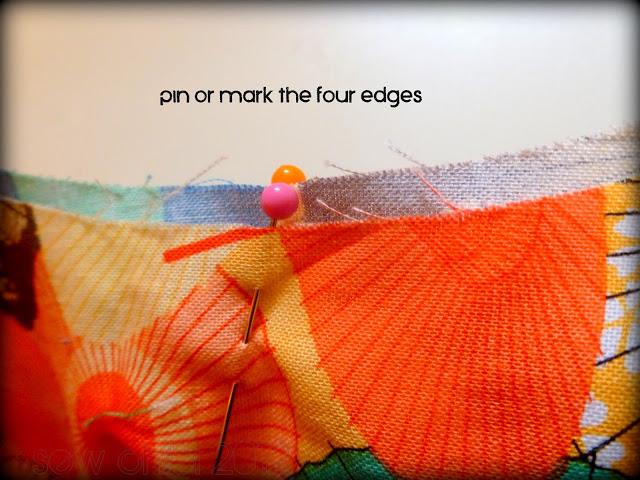
• Now you need to find the sides and center front and back of your bodice and mark them.
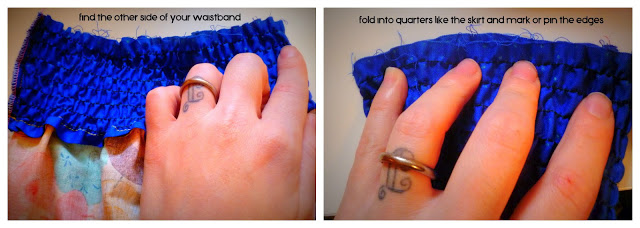
• Match the pins on the skirt and bodice and attach them the same way you did the bodice by pulling the shirring to match the eased skirt width.
Yeay! If you are just making the dress, you are done now.
But, just like the “choose your own adventure” books, should you wish to add buttons, please proceed to the next part!
Buttons
. So, there isn’t much way around it: there really aren’t any standalone substitutes for buttons on this dress. And I feel you; I am not the biggest fan of making buttonholes. Just like the weather, I never know what to expect! What I can say is it’s best to do them without any obstructions (seams or folds in the fabric) at all. And always mark they’re placement and be a little generous in start and stop point marks (in my experience, the edge is closer than you think!)
• So first you want to test what your buttonhole will look like on a scrap of fabric. You can use it later as a guide for making your buttonholes. Now place your buttons where you will want them on your dress. I think on the front 4-5 inches apart is good but make them a little closer together on the back (like 3 inches apart) and also just above the third from the bottom row of shirring.

I know the color of my buttons
seemed
perfect, but I am in love with this deep coral color of this fabric and I really wanted to use it.
• I covered my flat buttons because
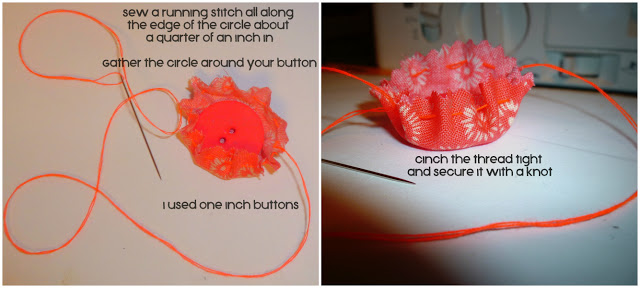
by Ashley, from Make it and Love it! Such a “Doi’! Why didn’t I think of that?!” moment! Anyway, make a template by tracing around your button just big enough for it to be completely covered with fabric. Basically you are going to make a fabric “yo-yo” and put your button inside. So hand stitch a running stitch about an ⅛” from the edge then put your button inside with the wrong side of the button facing the yo-yo opening.
• Hand stitch or machine stitch them in place… Maybe some of you didn’t know but you can machine stitch buttons by using a special foot (if you have a Brother cs6000 it’s the small clear and aqua foot that is emblazoned with the letter “M”). Lower your feed dogs and do a s l o w zig-zag stitch, making sure it’s wide enough to go back and forth in each hole. Stitch for about 10 seconds on a slow speed. Repeat for all buttons.
At this point you could make whatever your heart desires to attach to your dress! We are going to make a purse.
Purse
. I love pockets. I put them on everything anymore, but I wanted a way to do something a little different for this dress. What little girl doesn’t love a little purse?! Mine sure does! But she frequently loses them or gets tired of holding it so, ahem, I get stuck with it. This is a great solution! I’ve wanted to do a sewn-in-dress purse for a long time.
Alright, let’s do this!
(purse seam allowances are ¼” unless otherwise note)
• Cut two rectangles about 5¼”L by 7½”W of your main purse fabric and two of the same dimensions for the purse lining. Curve just the bottoms slightly.
• Cut one 7” circle (or trim circle leftover from your skirt) for the flap (I actually used two joined half circles because I knew I was using black eyelet).
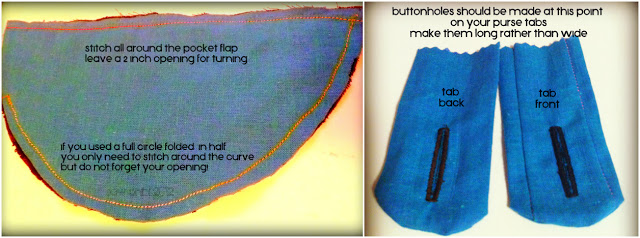
• Fold your circle in half. If you are using really light weight material, I suggest you interface the small area where you will want to put your Velcro. Now, you can either stitch them right sides together along the curve, pink or clip the edges, leaving a 2” hole for turning and then press (make sure press inside your opening) and topstitch, OR you could just leave them (wrong sides together) and do a little bias tape around the curve.
• Now let’s do the purse tabs. Cut four rectangles of fabric and four rectangles of interfacing that are 2½W” by 4” or 5”L and slightly curve one of the short ends of each tab. (
Disregard the fact that my tab fronts have those seams… I was using remnants that I had joined for an earlier project
).
• Interface each tab by facing the bumpy side of each piece towards the fabric wrong sides. Press for 10-20 seconds with a steam iron.
• Right sides together, stitch along one long side, around the curve, and then down the other long edge. Clip around the curve. Turn out and press. Use your test buttonhole that you made previously and mark where you would like placement. I like them to end about ½” to ¾” away from the curved end.
• For the buttonholes, I highly recommend making sure you use matching thread in both the top and bobbin. And test. Did I mention that? ;-) Start from the mark for buttonhole placement that is furthest from the curved edge and stitch towards the buttonhole mark by the curve. Cut the openings with a seam ripper or tiny scissors and fray check your buttonholes. Okay! Your tabs are done!
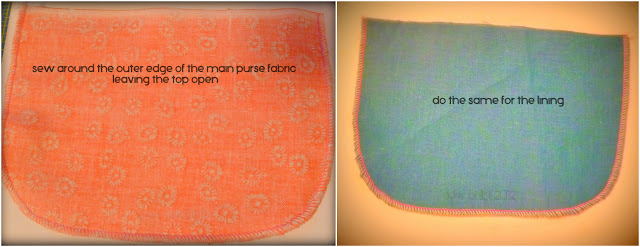
• Let’s make the main purse body. Stitch from one short side, along the curved bottom and up the other short side. Leave top open. Repeat for lining. Turn out and press.
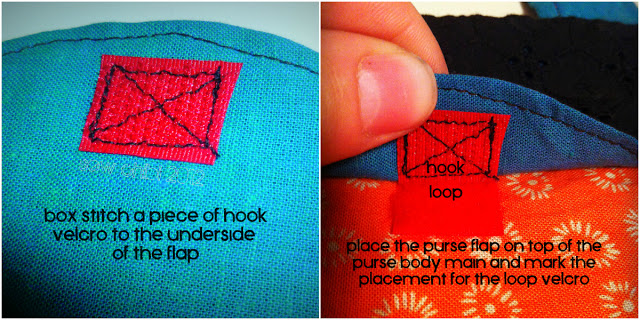
• Next, let’s do the Velcro. I personally don’t mind the stitching showing through on the purse flap because I planned on putting a covered button on top from the start, but if you don’t like that you can stitch it on before you close the sides. So, to put the Velcro on let’s take the hook piece and place it on the underside of the flap, about ½” away from the edge. Boxstitch it in place.
• To figure out the placement of the loop piece of Velcro, place the flap on to of the main fabric purse right side front. Mark the placement and boxstitch in place.
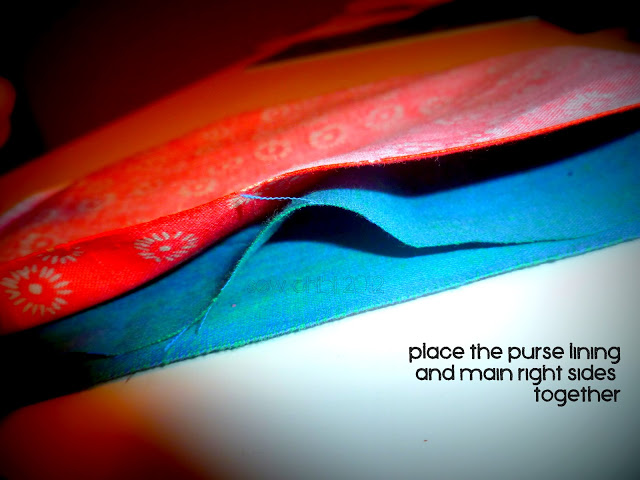
• So now place the purse main body inside the lining body.
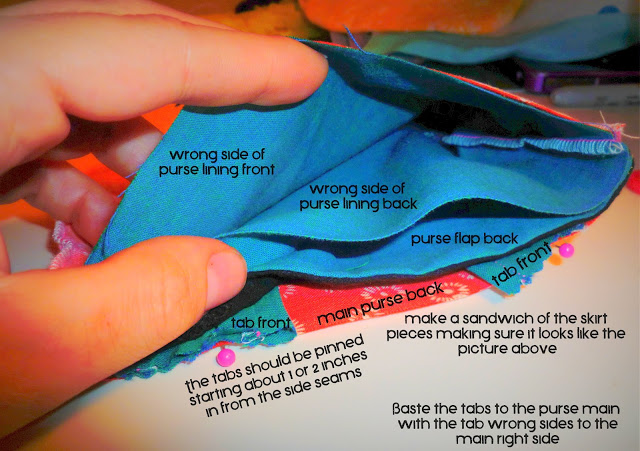
• Next we’re going to insert the tabs. Make a yummy purse sandwich! In between the two purse body layer backs, pin the wrong side of the tabs to the right side of the main fabric about an inch in from the side seams. Baste them in place.
• Place the purse flap inside the back two purse layers with the flap right side and purse tab sides facing together.
• Almost done! Now, pin the purse together and stitch starting from the back by one tab (farthest from the seam) and stopping at the inside of the opposite tab. Leave the back open (between the two tabs) open for turning the purse out. Make sure to catch all the layers in the back.
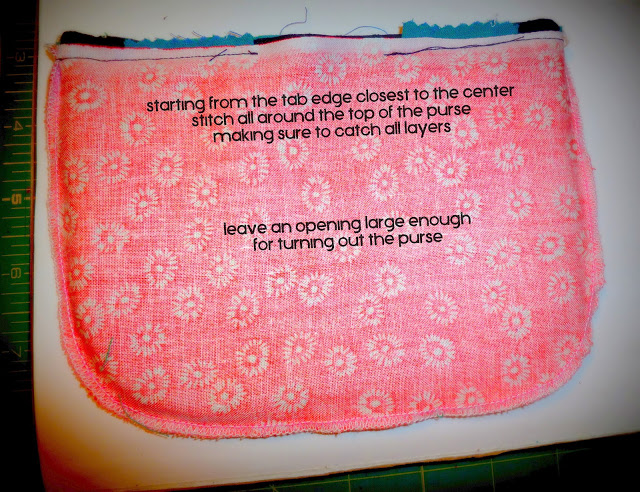
• Turn out and press. Press under the opening towards the inside and either slipstitch or topstitch. I do not fancy hand sewing so much, so I just topstitch all along the top.

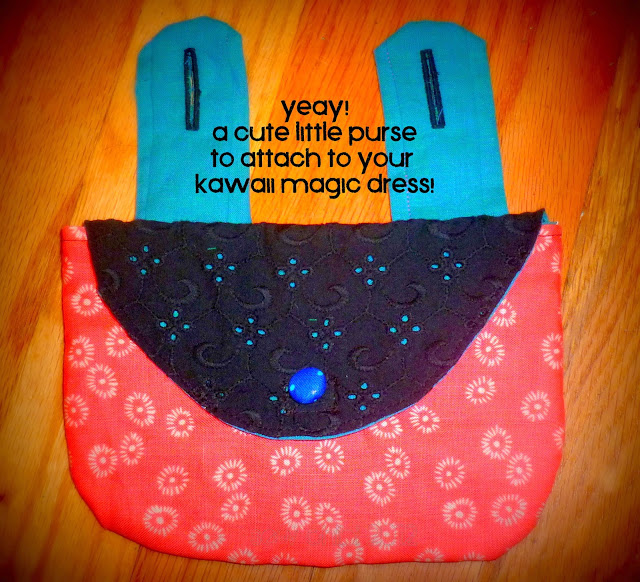
That’s it! You have a perfectly awesome little purse to attach as you please to your little princess’s dress! She’ll be so happy!!

So if you are interested in a
, pop on over to my blog and get the low down!
Here are a couple of pictures of my test run dress (
notice it doesn’t the shirred waist and neckline. I made those changes second time around
):
If you are interested in making the
, I can help you with that too!
If you have any questions, please leave a comment here on my blog! I hope this was all easy to understand!
Thank you so very much
for having me!! It was so much fun coming up with this and sharing it with you all!! If you make this dress please add it to my
flickr group! I’d love to see them!!!!
Have a super fantastic day everyone!!!


YAY! You're here! I'm so happy! I'm Kat! Mom, shawol, and pattern designer, this is the place where I share all of my sewing projects, chibi cosplay fashion, and DIY/tutorials! Everything around here is action-packed with color, silliness, and tons of kawaii stuff!